The 2024 Book Week theme, “Reading is Magic,” is exciting everyone. It’s all about turning pages into magical worlds. People are looking for unique, character-specific outfits.
This year, you can make a difference by upcycling costumes from your home. It’s like magic, turning the ordinary into something amazing.
You don’t need to buy a costume to be your favorite storybook character. Look at your closet and craft drawer with fresh eyes. A cardboard box can be a knight’s armor, and an old dress can become a royal gown.
This DIY approach is both creative and smart. It’s about making magic without spending a lot. For more creative costume ideas and specific tips, the journey from your closet to a castle is full of possibilities. Let’s see how simple repurposing can make the most magical upcycling costumes.
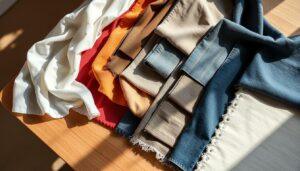
Conversions Gallery: bedsheet→cloak, T‑shirt→tunic, pillowcase→peasant dress, leggings→dragon tail, paper
Transforming a simple bedsheet into a regal cloak is a fun project. It needs minimal tools and lots of creativity. We’ll explore five key transformations that turn everyday items into costume pieces.
bedsheet→cloak
A bedsheet can become a majestic cape or robe. This no-sew method is great for a “Harry Potter” robe or a “Little Red Riding Hood” cape. It’s easy and produces impressive results.
Begin by folding a queen or king-sized sheet in half lengthwise. Place it over the wearer’s shoulders to mark the neck hole. Cut a small semi-circle at the center fold for the head.
Secure the front with safety pins, fabric glue, or a decorative brooch. For a Red Riding Hood look, use a red sheet and add a hood from a matching pillowcase. A solid color sheet instantly turns into a wizard’s cloak.
T‑shirt→tunic
An oversized T‑shirt is perfect for a T‑shirt tunic. It’s great for a Disney princess gown or a rustic medieval character. The trick is in the cutting and draping.
Choose a shirt two sizes too large. Lay it flat and cut straight across just below the armpits, removing the sleeves. Then, cut a deep V-neck or scoop neck in the front.
Use the discarded sleeve fabric to create a belt or sash. Tie it around the waist to create blousing and shape. For a princess look, add glitter fabric paint along the hem and neckline. A plain shirt becomes a medieval tunic with some strategic distressing.
pillowcase→peasant dress
A standard pillowcase has enough fabric for a child’s peasant dress. This project captures “Renaissance Fair” or storybook peasant vibes. It’s easy to make with minimal sewing or as a no-sew option.
Cut armholes on each side of the closed end of the pillowcase. The open end becomes the dress’s hem. Use ribbon or bias tape to finish the armholes and create a drawstring neckline.
Add a fabric belt or rope around the waist for definition. Embellish with simple embroidery or fabric markers for a handmade touch. This surprisingly effective conversion uses an item most homes have in surplus.
leggings→dragon tail
Old leggings or tights can become fantastic dragon tails. This technique is perfect for “Dragon” or general “Fantasy Creature” costumes. The stretchy fabric fits the body well.
Stuff one leg of the leggings with pillow filling, old fabric scraps, or even plastic bags. Fill from the foot upward to create a tapered tail shape. Leave the top 6-8 inches unstuffed to serve as an attachment point.
Sew or glue the stuffed leg closed. Attach the unstuffed portion to a belt or the back of pants using safety pins or fabric glue. Scale textures can be added with fabric paint or by gluing on felt triangles.
paper
Cardboard and construction paper are great for lightweight armor and accessories. Think “Cardboard armor” for knights or robots. These materials are easy to cut, shape, and decorate.
For knight’s armor, use large cardboard boxes to create breastplates and shoulder guards. Score and bend the cardboard to follow body contours. Secure pieces with duct tape or strong ribbon ties.
Robot costumes look cool with silver spray paint on cardboard boxes. Add dials and buttons using bottle caps or painted paper plates. Paper masks for animals or superheroes can be made from paper plates with elastic straps.
Remember to reinforce high-stress areas with extra layers of cardboard. This approach emphasizes creativity over complex construction.
Finishing Techniques that Elevate
To turn a simple craft into a convincing character costume, you need to master a few key finishing techniques. These professional touches make a basic homemade item look like it came from a storybook. You don’t need to be an expert; just a bit of creativity and the right approach.
This guide will show you five easy ways to add depth, texture, and authenticity to your creations. From cleaning up seams to adding a worn, adventurous look, these techniques will transform your converted items.

Raw fabric edges can look messy and unravel. Binding is the secret to a clean, polished finish. It involves enclosing seams or hems with a strip of fabric, like bias tape or ribbon.
This technique is perfect for giving a professional look to simple conversions. For example, using colorful bias binding on the armholes and neckline of a pillowcase dress instantly makes it resemble a tailored peasant gown. It’s a quick step that adds durability and a pop of color.
Dyes
Sometimes the base color of an item isn’t right for the character. Fabric dyes offer a powerful solution for complete color transformation. Modern dyes are safe, simple, and effective for home use.
For a solid, rich color on a bedsheet cloak or t-shirt tunic, follow these steps:
- Choose a fiber-reactive dye for cotton or a dye formulated for synthetic blends.
- Pre-wash the item to remove any finishes.
- Use hot water and salt (for cotton) to help the dye set permanently.
This method allows you to turn a light sheet into a deep royal blue or a green t-shirt into a forest hunter’s tunic.
Fabric Paint
Fabric paint is your tool for adding detailed designs, heraldic symbols, or magical patterns. It turns plain fabric into a canvas for storytelling. Paints come in bottles with fine tips for drawing or broader brushes for filling areas.
To apply fabric paint successfully:
- Place cardboard inside the garment to prevent bleed-through.
- Sketch your design lightly with a pencil first.
- Apply the paint in thin layers, allowing each to dry completely.
You can create a family crest on a tunic, constellation patterns on a cloak, or scales on a dragon tail made from leggings.
Contact Paper
For props and armor, contact paper is a versatile superstar. This adhesive-backed vinyl comes in metallic, leather, stone, and woodgrain patterns. It’s ideal for covering cardboard crafts to create realistic surfaces.
To make knight’s armor or a dragon shield:
- Cut your shield or chest plate shape from sturdy cardboard.
- Cut the contact paper slightly larger than the shape.
- Peel the backing and smooth the paper onto the cardboard, pressing out air bubbles.
- Trim the excess for a perfect, convincing finish.
This technique adds texture and visual weight without the complexity of real metal or leather.
Aging
A pristine costume might not suit a rugged pirate or a weary traveler. Aging techniques impart a storybook-worn, lived-in look. They suggest history and adventure.
Safe and effective aging methods include:
| Method | Best For | How-To |
|---|---|---|
| Tea Staining | Light-colored fabrics (cotton sheets, pillowcases) | Brew strong black tea, let cool, dab or dip fabric, then air dry. |
| Strategic Sanding | Edges of cardboard crafts, knees of leggings | Use coarse sandpaper to scuff areas that would naturally wear. |
| Dirt & Shadow | Adding grime to a pirate’s tunic or a knight’s gloves | Mix brown/gray fabric paint with water and lightly sponge on. |
These techniques add depth and make the costume feel authentic and part of a larger narrative. A freshly made pillowcase dress can become a peasant garment worn for seasons with just a little tea staining.
Mastering these five finishing techniques empowers you to add that final layer of magic. They are the defining details that convince the audience your character has stepped right out of a storybook.
Comfort & Wearability
Designing a costume for real-world use means focusing on comfort from the start. A Book Week parade or school event is a long event. Your child will be in their costume for hours, moving, playing, and being their character.
Comfort is a must. The goal is to make the costume feel like a second skin, not a burden. Good design is key to this.
There are three main things to keep in mind: adjustable fit, breathable materials, and non-restrictive movement. Let’s look at how to use each.
Start with the fabric. Old bedsheets and cotton T-shirts are great choices. They’re soft and let air through. Stay away from heavy, non-breathable materials like vinyl or thick plastic. They can make your child too hot and uncomfortable.
Design for freedom of movement. A knight needs to swing a cardboard sword. A fairy needs to twirl. Avoid tight designs, like those that restrict the shoulders or knees. Simple tunics, cloaks, and A-line dresses from pillowcases work well. Use elastic waistbands or ties that can be adjusted. This follows inclusive design principles for kids costumes.
Embellishments add character but must be applied carefully. This is where safety and comfort meet. Lightweight items like bottle caps can make great armor scales or fairy details. The key is to attach them securely and flat.
Use strong fabric adhesive to glue them firmly so they don’t snag or fall off. Make sure there are no sharp edges. Place them on areas that won’t dig into the skin, like the chest of a tunic or along a belt. This approach to creative reuse of household items keeps the costume light and safe.
Think about the full experience. Can your child sit down in their dragon tail? Can they easily use the restroom? Test the costume at home before the big day. Make any needed adjustments to straps or fasteners.
A comfortable costume lets your child fully enjoy their role. They can focus on the magic, not on adjusting an itchy seam or a cumbersome prop. That’s what makes a costume successful.
Kid‑Safe Adhesives & Paints
Before starting your foil armor or painting a dragon, check your materials. The right products keep your child safe and make cleaning up easy. This guide helps you find the best products and avoid the bad ones.
Look for two important labels on any paint or adhesive. The ACMI AP (Approved Product) Seal means it’s safe. The ASTM D-4236 label shows it’s been tested by experts. These labels are your guides at the craft store.
For paints, choose water-based ones. Acrylic and fabric paints that say “non-toxic” are great. Stay away from oil-based paints and sprays. They can harm your skin and are hard to clean up.
For making foil armor or cardboard crowns, you need safe adhesives. Fabric glue is good for sticking cloth to cloth. For attaching foil or paper to fabric, use a glue stick or white school glue. They dry clear and are easy to clean.
Hot glue guns are popular but need adult help. Use a low-temperature gun and tell kids the nozzle and glue are hot. For most projects, a liquid adhesive is safer.
Here’s a quick comparison to help you choose the right adhesive for the job:
| Adhesive Type | Best For | Key Safety Feature | Brands to Look For |
|---|---|---|---|
| Fabric Glue | Attaching felt, ribbons, or patches to cloth tunics. | Washable, flexible, and non-toxic when dry. | Aleene’s, Beacon, Elmer’s. |
| White Craft Glue | General paper, cardboard, and lightweight material bonding. | Water-soluble, AP Certified non-toxic. | Elmer’s Washable School Glue. |
| Low-Temp Hot Glue | Quick, strong bonds on non-wearable props. | Adult-use only; cools faster than high-temp glue. | Surebonder, AdTech. |
Choosing safe materials is key to responsible crafting. It’s good for your kids and the planet. Always read labels, even if you’ve bought something before. Formulas can change.
Remember: If a product smells strongly, it’s a warning. Good kid-safe products usually don’t smell much. Test a small amount on yourself before letting your child use it. Your careful choice makes crafting safe and fun.
Quick Styling & Photography
Learning a few quick styling and photography tricks can make your upcycled costume unforgettable. The look of a parade or event depends on how you present it. Your homemade costume needs to shine.
Styling is the final touch that makes a big difference. A simple hairstyle, one key accessory, or a prop can make your character pop. These small details can have a big impact.
Here are some fast styling hacks:
- Hairstyle is Half the Battle: A braided crown turns a child into a woodland elf or princess. Messy hair works great for pirates or wild adventurers.
- The Power of One Accessory: One statement piece can change everything. A beaded necklace can make a simple tunic royal. A fabric belt can shape a pillowcase dress.
- Prop it Up: A prop can complete the story. A cardboard sword, a stuffed animal, or a glittering wand adds depth to any budget costume.
After styling, capturing the moment is important. You don’t need a fancy studio. Simple techniques can make great photos.

Lighting is your best friend. Natural light from a window is perfect. Avoid harsh overhead lights. Outdoor shots in open shade are great for your DIY outfit.
Angles and composition are key. Shoot from the child’s eye level for a powerful portrait. Fill the frame with the costume. A slight tilt or action pose adds energy.
Use a simple backdrop. A plain wall, a hung bedsheet, or a garden corner works well. This keeps the focus on the costume, not the background. These tips help you capture the magic.
Great presentation celebrates the effort and creativity. It makes lasting memories. Sharing these photos online can inspire others to be creative. A fantastic budget costume deserves a great showcase.
Case Studies with Before/After
These case studies show that sustainable costume making is not just possible but also amazing. We see real changes, from a “before” pile of household items to the final “after” look. This proves upcycling can be powerful and inspiring.
Let’s look at two examples. Each shows a clear, easy-to-follow process for making a costume.
The Scholarly Wizard
The “before” pile had a faded blue bedsheet, a cardboard tube, and a worn-out tie. The goal was to make a wizard from fantasy stories.
First, the sheet was cut into a flowing cloak. A cord belt was added at the waist. The cardboard tube became a wand, decorated with markers and wire.
The old tie was turned into a sash. A hat was made from poster board and painted.
The “after” look was a wise wizard. This project gave new life to items that might have been thrown away. It’s a great example of sustainable and affordable costume making.
This transformation used a shiny tablecloth, a white pillowcase, and holiday lights. The goal was a princess from fairy tales.
The tablecloth became a cape, tied at the shoulders. The pillowcase was turned into a peasant dress with armholes and a belt.
The lights were woven into the hair for a magical glow. A crown was made from foil and plastic gems.
The final costume was regal and radiant. It shows how everyday items can become key parts of a costume. This method avoids buying new fabrics, making it eco-friendly.
Both examples show a key idea. With some vision and basic skills, you can use what you already have. This way, you can make unique costumes without wasting anything.
This sustainable approach saves money and helps the environment. It also teaches us to be creative and resourceful. The journey from “before” to “after” is the most rewarding part.
Cleanup, Storage, and Reuse
A great costume project deserves a proper finish. Cleaning up and storing smartly keeps your space ready for the next adventure.
Begin by removing any leftover residue. A damp cloth works well for fabric paints like Tulip Soft. For kid-safe adhesives like Elmer’s Glue, warm, soapy water is best. Clean up any glitter or dye spills on surfaces.
Store your costume parts wisely. Fold cloaks and tunics neatly. Store smaller items like crowns or belts in labeled bins. This way, you’re always ready for play.
See your leftover materials in a new light. Felt scraps can make fairy wings. An extra pillowcase turns into a satchel. This approach reduces waste and inspires new ideas.
This cycle of create, store, and reuse is key to sustainable crafting. It lets you build a versatile toolkit from common items. You’re always ready for any storybook character.

